5 Mark Making Exercises to Jump Start Your Art

Are you an artist who hates to draw? Making daily marks for 15-30 minutes a day will improve your creative work flow not only in the studio, but in all aspects of your life. These 5 easy exercises will help you get that pencil moving!

In the first part of my 2018 Resolutions post I encouraged you to draw at least 15-30 minutes a day and as a result of this prompt, I received many requests for suggestions on how to get started. Even if you think you can’t draw, think you don’t know how or just stubbornly refuse, these 5 exercises will help. But before I discuss the How, I would like to discuss the What and Why I feel you must draw everyday.

The What…let’s take the word ‘drawing’ out of this article for now because it tends to scare people. When I’m teaching, I use the words drawing and mark-making interchangeably because for my purposes they are the same thing with only very slight differences. Think of it this way…a mark communicates a word and a drawing expands that word into a sentence…a poem…a sonnet. As artists, whatever we do in the course of making work begins as a mark on a surface made by one human to be interpreted by another in an effort to communicate. Mark making is expressive, gestural, emotive and works of art that contain such marks are the ones I will cross the room to view-they literally speak to me without words, they communicate. No matter what kind of work you make or in what medium, understanding your mark, what it is and how to make it, will make you a better communicator through that work.

The Why…Critic Lance Esplund writes, “Line is a rich metaphor for the artist. It denotes not only boundary, edge or contour, but is an agent for location, energy, and growth. It is literally movement and change – life itself.” This quote speaks to lines specifically, but for the purposes of this article, we’ll think of marks and lines as one in the same. The mark adds the lifeblood to the work that sets it apart from anyone else’s. Your personal mark or gesture is literally as unique as your signature and practicing making marks everyday is the only way to find that mark. As I mention in my Resolutions post, when you practice moving those parts of your body and brain required to make a drawing, everything else in your art making process flows much more smoothly. How many times have you entered the studio cold and stiff from not working and end up puttering around wasting time? Or picked up a paintbrush, but just couldn’t make the paint say what you wanted? The more marks you make and the more frequently you make them, they become indelibly written on your brain, your movements in the studio become more practiced and you will approach the work with confidence and knowing. I’m not saying that drawing everyday will rid you of all the struggles us artists face in the studio, but I absolutely guarantee that it will get you moving faster and in the right direction toward your goals.

The How…Now for the fun part. Your daily drawings can be made with any media on any substrate and inspired by any subject. I like to give myself ‘projects’ in which I work on a series of drawings inspired by one thing with the same media for one month. This offers me a chance to work out every angle of a certain subject and/or experiment with new media. At the end of the month, I also have a series of drawings that may be strong enough to show. Visit this post to read about one of these drawing series’ of mine. You can choose to work with monthly projects or you can draw something different everyday, the point is to make marks daily for 15-30 minutes. For those of you who think you’re too busy to spare this time, I suggest in my resolutions post that you always have a sketchbook and drawing tools with you in your bag because you may have more time than you think…on the bus/train, waiting at the doctors office, waiting in line at the food store. It’s almost depressing how much time we spend waiting so why not do something constructive while you’re at it. Last, don’t forget to set that timer! I’m a stickler about setting the timer for daily exercises like this and I explain a bit about why in this post. In a near future post I’ll talk about restrictions and why they are so important in art making. For now, understand that the timer will create a time-space for you to focus only on what you’re doing. For that short time, you don’t have to think about or do anything else but that draw.

The following drawing ideas are tried and true-a few have been used in art schools for centuries and a few I’ve modified and used over and over in my workshops. Once you start, your creative brain will begin to flow with many of your own ideas. At the end of this article I share some drawings from my workshop participants as well as some other artist’s works whose marks and processes I find inspiring. If you see your drawing below, let me know and I’ll add your name!

The Ideas

  1. Blind Contour Drawings If you went to art school, you probably went blind making blind contour drawings-they are used so much as a learning tool and that is because they are so helpful. Start by staring at an object in front of you for one minute. Then close your eyes and imagine the object in your minds eye…try to see its color, its form, its texture, it’s scale. Then open your eyes and look at the object in front of you. How does it look? Try to spend two minutes (or longer) just looking at the object, examining it in great detail. Then close your eyes and draw it continuously, keeping your eyes closed for a full two minutes. Don’t lift the pencil or open your eyes until your full two minutes are up. If you ‘finish’ drawing your object under two minutes just draw it again. If you find you can’t help yourself from cheating, wear a blindfold. Do this with the same object over and over, or try different objects in order to fill your 15-30 minutes. Another variation is to begin with the blind contour and then with your eyes open, ‘connect’ the sketchy lines you drew to make a new drawing.
  2. Opposites Make drawings in pairs which express opposite adjectives. For example, make a drawing which is noisy in as many ways as possible – your pencil should make a lot of noise as it vigorously scribbles and scratches across the page, and the finished drawing should be noisy in the way in which it communicates. Then take a breath and make a very quiet drawing. Your pencil should hardly touch the paper (imagine it’s the tip of a feather). Hold your pencil far away from the drawing end so you cannot apply too much pressure. Hush your pencil as you draw, and let the end result be a very shy drawing. Enjoy the differences between the two drawings – let your ideas bounce off each other. Push yourself to extremes of noisy and quiet.
  3. Words Choose 5 words randomly from the dictionary and either write them at the top of the page or begin with a drawing of the word itself. I use Design Language by Tim McCreight in my workshops because the words in it lend themselves to visual inspiration. Working on the same paper, spend one-2 minutes interpreting each word with marks. Let each word’s marks intertwine and overlap. Take this drawing a step further and add more marks, collage or stitch to make it a cohesive drawing.
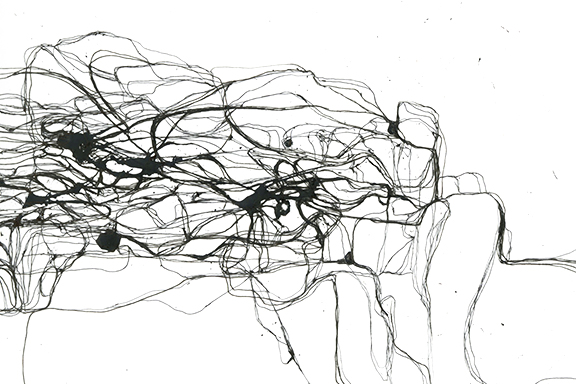
  4. Music This idea comes from one of my favorite artists, Wassily Kandinsky, who believed that colors and marks in paintings created visual ‘chords’ which resonated in the viewer. A must read for any artist is Concerning the Spiritual in Art by Kandinsky in which he writes in depth about the essence of expressionism in painting. Create a playlist of 30 seconds of 20 different songs ranging in tempo, style, genre, etc. Using a large piece of paper on the floor or taped to the wall (must be positioned so that you can use your body expressively) and gather 5 different drawing tools near you so you can switch if you’d like. Turn on your playlist so the songs play successively with only 3-5 seconds between each. Respond to each song with marks and allow the marks to overlap and intertwine. At the end of the playlist, the drawing will likely look like a bunch of scribbles, so what you want to do next is isolate certain areas to use for inspiration. Cut a rectangle out of a piece of paper and float this frame over the drawing. As you do this, you’ll find so many great ideas for marks that you can trace and use in paintings. Another variation is cut up your large drawing and scatter the cut outs onto another large piece of paper. Experiment with with creating new distances between the cut outs, turn them upside down or rip them in half. Begin drawing new elements and shapes in between the old ones to create a new drawing. Forget your original drawing and think about new meanings which might be created, think about how the new drawing might be interpreted.
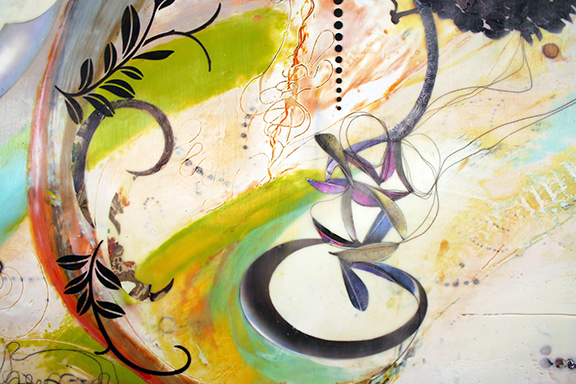
  5. Response This is my personal favorite method to begin a drawing and I have completed many series this way. ‘Response Drawing’ is a term I coined in one of my workshops and it just stuck. Response drawings are basically just as the words describe… it is a response to marks either you or someone else made intentionally, accidentally or found. Responding to marks that are not yours encourages you to expand your mark making vocabulary by making marks you aren’t normally inclined to make. There are many ways to begin a project like this but the basic premise is to begin with some kind of mark on a substrate-it could be a splash, a pour of paint, a burn, a footprint,  rust print, transfer print, a mistake. It could be something you found in the trash, a folded or cut piece of paper, crushed pencil shavings, anything! It could be a project between you and a friend in which one of you makes a mark and the other responds. This actually has a name -Exquisite Corpse- a term and game invented by surrealist creatives. I’ll be writing a more in depth post about Exquisite Corpse, but in the meantime you read about and see some examples of them here. However your first mark is generated, the next step is simply to respond to it in any way you want. The image at the top of this page is from a series of drawings from 2005 called ‘Flesh’ in which I started with tracing paper that had been burned and splashed with watercolor and I then responded with organic forms drawn in graphite and colored pencil. See more from this series in the images below.

If this post was helpful to you, please let me know, I invite your comments questions and suggestions in the comments section now located in the upper left sidebar of this post.

In my next post, I’ll share with you my acrylic/gouache series of layered drawings. I’ll discuss my approach and process for these drawings and how this whole series began by drawing only 15 minutes a day.

Image Links (read left to right from top row)

  1. Workshop student exquisite corpse.
  2. Lorraine Glessner Flesh series response drawing.
  3. Jeri Ledbetter, artist, see her work here and here.
  4. Lorraine Glessner, found ledger sketchbook response drawing.
  5. Workshop student exquisite corpse.
  6. Emma McNally makes drawings responding to unlikely sounds like white noise and city sounds. See her work here.
  7. James Watkinson responds to aged paper and stains of old book covers with detailed narrative drawings. See his work here.
  8. Ayanna Jolivet Mccloud’s experiments with a china marker, making as many different marks as she can. See her work here.
  9. Workshop student music response drawing.
  10. Workshop student scattered elements response drawing.
  11. Workshop student music response drawing.
  12. Workshop student music response drawing. I love how the strong shadows and deep wrinkles of the paper contribute to the drama of this drawing.
  13. Lorraine Glessner Flesh series response drawing.
  14. Workshop student found object mark response drawing.
  15. Workshop student music response drawing.
  16. Workshop student architectural sketch response drawing.
  17. Lorraine Glessner Flesh series response drawing.
  18. Workshop student mixed media drawings collage.
  19. Workshop student mixed media drawings collage.
  20. Workshop student found object mark response drawing.
  21. Workshop student mixed media drawings collage.
  22. Workshop student scattered elements response drawing.


A Desert Artist Retreat: Exploring Landscape Through Encaustic & the Mark

Awestruck, we found ourselves face-to-face with the rising sandstone cliffs of the Capitol Reef. The only comparable vista that I have ever seen is at the site of Petra, in the land of Jordan. However, the Capitol Reef is not only much vaster — extending over a hundred miles; unlike Petra — where Man had a major role in carving out its topology and architecture — the Capitol Reef owes its unique landscape and incredible array of multi-colored sandstone canyons, castles, pinnacles, and buttes — some of them reaching right up to the sky — to Nature’s rich endowment of evolutionary forces. Here, over eons, the rain, the snow, the sun, and wind have converged, employing all of their might to render a grandiose and unforgettable landscape.

Terry Tempest Williams

What
A Desert Artist Retreat: Exploring Landscape Through Encaustic & the Mark
Limited to 8 participants! 2 Spaces Available!
Level: Intermediate to Advanced
$755 includes most materials (see below)
For Registration, Please Contact: Lorraine Glessner, lorigles@earthlink.net

When
August 21-25, 2017, 10am-4pm each day

Basic Description
Utilizing the natural luminosity, textural and layering possibilities of encaustic, participants will experiment with innovative materials, drawing and marks to depict the spirit and essence of the land. Easy to moderate hikes exploring the high desert landscape of Torrey, Utah are led by Jeff and Lorraine and will provide the inspiration for which to develop ideas and provide areas of focus for series based work while also developing your personal artistic voice. Considerations of the use of the grid as a conceptual and compositional tool as well as its direct relationship to landscape will also be discussed. Optional individual critiques with both instructors will be offered to all participants.

 SCROLL DOWN TO SEE the images below of student work and fun scenes from hikes and studio during last year’s Torrey Retreat, 2016.

torreypromo

Where Jeff Juhlin Studio, in beautiful Torrey, Utah located just outside of Capital Reef National Park in the heart of the southern Utah Red Rock country. (pictured above: Jeff Juhlin’s Torrey, Utah home and studio)

SCROLL DOWN TO SEE the pics below for more of Torrey’s amazing landscape and Jeff’s studio, as well as additional blog posts related to the Torrey landscape here, here and here.

Who A collaborative teaching venture with Jeff Juhlin & Lorraine Glessner

Jeffjuhlin.com
Jeff’s work is about discovery, the hint of possibility. It’s about the layers or strata of things substantive, imagined, physical and implicit. He accumulates layers of material, images and color that make up the whole of a painting, then goes back in and to explore, excavate, expose and obscure. The end result is a non-literal visual form, a translation of that experience and process.
Jeff uses various materials and mediums to create these works however encaustic incorporated with mixed media including paper, ink and oil paint are most often the primary mediums. Encaustic’s luscious luminosity; physical presence and translucent quality seem the ideal medium to explore this process.
Jeff has completed Residency/Fellowships at the Virginia Center for the Arts and VCCA France, Moulin Au Neuf, Auvillar France. He has been Artist in Residence 2010-2015 at the Hui Art Center in Maui, Hawaii. His work can be found in numerous private, corporate and public collections as well several public art commissions. Jeff holds a BFA degree from the San Francisco Art Institute. He maintains studios in Salt Lake City and Torrey Utah. He teaches Regularly at the Hui Art Center in Maui, Hawaii, the Kimball Art Center in Park City Utah and at his Studio in Salt Lake City.

lorraineglessner.net
Lorraine Glessner’s love of surface, pattern, markmaking, image and landscape has led her to combine disparate materials and processes such as silk, wood, branding, rust, paper and more in her work. Lorraine is an Assistant Professor at Tyler School of Art, Temple University, a workshop instructor and an award-winning artist. She holds an MFA from Tyler School of Art, Temple University, a BS from Philadelphia University, and an AAS in Computer Graphics from Moore College of Art & Design. She has a diverse art background with skills that include painting, sculpture, graphic design, interior design, textile design, photography, digital imaging and much more. Among her most recent professional achievements is a Second Place award in Sculpture from Art of the State at the State Museum in Harrisburg, PA, a recently completed artist residency at Jentel Foundation and an acquisition by Kelsey-Seybold Cancer Center in Houston, Texas. Lorraine’s work has been exhibited locally and nationally in galleries, craft centers, schools, libraries, universities, and more. Like her work, Lorraine brings to her teaching a strong interdisciplinary approach, mixed with a balance of concept, process, history, experimentation, problem solving and discovery.

What Else?

  • Color relationships, composition, application, content, proportion, scale as an effective foundation for other painterly information.
  • Learn how to use encaustic’s strengths (layering, transparency, luminosity) to tell your story.
  • Mark-making exercises geared toward making simple or complex marks to generate a personal language.
  • Individual consultation/critique discussion with each participant. Bring a piece of work, a question, a concern, a problem and discuss it with Jeff and Lorraine.
  • Daily hikes and meditations relax and open your mind and spirit to the land and to your own creative voice.
  • A slide talk with examples of contemporary artists whose applies the concepts discussed in the workshop is offered for inspiration.
Student work and other fun stuff from Torrey Retreat, 2016

Materials Included: the following is a list of materials provided for the student

  • All encaustic paints, extra medium, tools and equipment
  • Graphite paper, sumi ink & other misc. drawing media
  • Misc. drawing papers
  • Paper towels/rags
  • Extra encaustic brushes

What to bring: the following is a list of materials for the student to bring to the workshop

  • Sketchbook/notebook, pencil or pen for note taking
  • Smock (optional)
  • Closed toe shoes for safety in the studio
  • Lunch and beverage each day
  • 6-10 wooden painting panels (your preference of 8×8 or 10×10, but no larger or smaller, please) Experimentation is great! You must bring the wooden painting panels, but other suggested substrates are: stiff card, paper, masonite, board, plexiglass, etc. (nothing coated in acrylic or acrylic gesso!!) wooden panels will also be available for sale in the studio during the workshop.
  • 2-4 actual or images of your work
  • 5-10 natural hair brushes in various sizes for encaustic painting (1 brush will be designated your medium brush, so it must be free of color if you are bringing used brushes)
  • a variety of basic encaustic colors will be provided, however, if you prefer certain colors, please bring them. (containers provided)
  • a variety of pigment sticks will be provided, however, if you prefer certain colors, please bring them.
  • drawing media of your choice (pencil, pastel, conte charcoal, oil pastel, Crayon, graphite, felt pen, etc.)
  • any tool or material for any technique that you normally employ while working with encaustic
  • iwatani torch with extra butane (optional)
  • textured objects and/or sharp ended tool for pressing into/incising/writing/drawing into wax.
  • 1 lb encaustic medium (containers provided)

 Hiking Equipment Recommendations

  • Sturdy hiking shoes/boots
  • butt pack or small backpack
  • comfortable clothing
  • light rainwear
  • Hat
  • water bottle
  • Digital Camera or smart phone or point and shoot camera or DSLR
  • bag for collecting found materials

For Registration, Please Contact: Lorraine Glessner, lorigles@earthlink.net

Payment Payment of 50% of the workshop fee + materials ($377.50) is due at the time of registration with the remaining 50% ($377.50) due on the first day of the workshop. Please contact Lorraine for payment details.

Cancellation In the event that you need to cancel your workshop, please notify Lorraine at least 30 days prior to the start of the workshop and your deposit will be refunded. No refunds will be available for cancellations occurring less than 30 days from the start of the workshop.

Accommodations  THE CABIN HAS BEEN FILLED. SEE BELOW FOR ACCOMMODATION RECOMMENDATIONS (Pictured below) The large cabin next to the main house and studio is walking distance to the studio and is available for $100 per night with each person an additional $25 (up to 6 people) and a $100 deposit. It includes one bunk bed (two beds) Rear bedroom, two single beds in a middle bedroom and one double bed in the other middle bedroom, (see images) one full bath, full kitchen. A group of friends could take the whole cabin or 3-6 people could stay there for very little cost. Please contact Jeff jeffjuhlin@yahoo.com if you are interested in renting the cabin on the Torrey property.

lodgepromo1lodgepromo2

Cabins and hotel rooms in town (less than 10 minutes away) Start at $60 and up. There is a tent camping and mobile home park in Torrey also. Please see the web sites below or contact Jeff for more information.

torreyutah.com
airbnb

Food Filtered water will be available for drinking and tea, however, you may want to bring other preferred beverages. There will be no food served during the workshop, you must bring lunch and snacks each day. There is a full supermarket 25 Min away located on Loa, Utah and a small market right in Torrey with local meat, some vegetables and basic food items plus a Deli that serves breakfast and lunch. Contact Jeff jeffjuhlin@yahoo.com if you have specific food needs and questions.

5 Encaustic Tools I Can’t Do Without

Since the start of the year, I have slowly been purging my studio of materials I have acquired over the years. Each time I pick up an item, I ask myself if I really need this thing, will I ever do anything with it? As I make my way around the studio to my encaustic table, I can’t bear to rid myself of any of my encaustic supplies, so I’m working backwards..isolating the items that I can’t seem to do without, the things that I reach for all the time, everyday. Of course, there are a lot more than five tools I use, but if I were stranded on a deserted encaustic island, these are the things I would want with me. I use all of these tools in my encaustic workshops, explain the techniques and bring extras for students to try out. So if you haven’t signed up to take a workshop with me this summer and fall, do so now because they are filling fast!

  1. Clover Mini Iron

29949-clover-mini-iron-mci-900

This tool is one of the first tools I ever used when I started working with encaustic in 2001. At that time, there were very few tools available and very little information about encaustic until Joanne Mattera’s The Art of Encaustic Painting came out a year or so later and changed my life. Until that time, I muddled through on my own, learning this difficult medium with snippets of information from the internet and materials I already had in my studio. In my former artist life, I was an art quilter and has this little piecing iron that I used to iron the seams of my quilts, so I tried it as an alternative to the heat gun and fell in love. Not only is the Clover Mini Iron an excellent little detail iron, but it is the ONLY tool I use to fuse collage and my horsehair drawings. When I first started teaching encaustic workshops in 2005, those who hired me as well as workshop participants would laugh when they saw the irons because no one was using them at the time. One of the things about my work that people respond to is the craftsmanship and how the collage seems to merge seamlessly into the painting rather than being a separate inclusion. This is wholly because of this iron. Those of you who have taken my workshops know that I do not recommend the torch for collage for safety reasons-often the medium is blown off of the paper collage during the fusing process and it ignites. Most importantly, both the torch and the heat gun introduce air and most of the time the collage piece pops up a bit and does not lay flat on the surface. For a lot of artists, efforts to remedy this annoyance often ends in frustration or giving up encaustic collage for good. Once learning to use this and other small irons for collage, the work will drastically improve, guaranteed!
I’ve had mixed reactions with workshop participants who have tried this iron during my workshops, some find it awkward. I recommend The Dritz Petite Press as an alternative just for fusing, but I find it difficult to use for collage. If you use collage in your encaustic work and have experienced frustration, I encourage you to take one of my workshops this summer and fall to learn my technique.
Two more amazing things about this iron is that it has it’s own temperature gauge and it can also be used as a heated palette knife.
This iron is available online and in-store at most craft and hobby stores that sell fabric related craft supplies as well as online at Amazon here, where I have always found the best prices.
NOTE: If you do a google search for the clover mini iron, make sure it the one you purchase looks like the one pictured, don’t confuse it for the Clover Mini Iron II which is red and white, not mint green and white.

2. Double Sided Detail Scraper
1824_1_
Other than my Clover Mini Iron, double sided detail scraper is the tool I use the most. I have purchased dental tools, wax carving tools, Kemper clay shapers, wood carving tools, etc. and I rarely use them. This tool is extremely versatile and supplants most of the tools of it’s kind. First and foremost, it is an excellent detail scraper for those hard to reach areas. The two sizes, pointed tip and the curved nature of the blade allow for almost any kind of scraping in any kind of area. I also love it for carving complex lines and shapes. The attributes I previously mentioned also allow for carving any shape-small or large or for any line, thick or thin. The use of the blade’s wider area and narrower pointed tip enable me to make my incised calligraphic lines in the wax, making it the closest thing to real drawing in wax. In some of my older work, the complex raised areas shown in the image below are only made  using this tool. It is also the only tool I use to place the hair for my hair drawings. The blade is wide and the curve is gentle (almost flat) giving it enough surface area to press the hair down without gauging the surface. I also use it to clean up the clingy wax from the edges of the stenciled areas of my paintings. Last, it’s also excellent for removing dust and those weird little hairs that always seem to find their way into the wax.
I have seen Kemper tools with one side shaped like this scraper, but never the double sided tool I have described here. I have only seen this particular tool sold by Enkaustikos here.

3. Sculpture House Encaustic Loop Tool

Sculpture-House-Encaustic-Loop-Tool-0

Possibly the best scraper ever invented, it works like a combination razor blade and the average clay scraper. I still love my razor blade for taking off little bits and my other scrapers for their specialties, but this scraper is the one I reach for again and again, especially when I need to really cut into the surface and remove some wax. Hand-made with a carbon steel blade, it is extremely sharp and makes scraping so easy, with less residue and annoying ‘gum up’ on the blade. It removes the wax in a long, fine ribbon, which I have never seen in any other scraper. I love these scrapings so much, I have started collaging them back into the work in places where I want a multi-colored, textured effect. After the scrapings are fused, they can be left as-is for raised texture or scraped back further for an interesting ribbon of color. The corners of this tool are also great for making wide incised lines.
I first purchased this tool from Enkaustikos here, but it is also available directly from the Sculpture House web site here. I recently emailed SH because I hadn’t seen the tool on their web site for quite some time, but it has just been re-listed. Get them while they’re hot!

4. Ball Stylus

il_340x270.730490254_5keq

Many of you probably use this tool, but I’m always amazed at how many people have never seen it or know what it is when I use it in my workshops. Originally designed for embossing into soft metal or paper, this tool is useful for many art projects. I love it for incising in the wax because it’s rounded end doesn’t cut into my board surface and chop it up like pointy tools do. It’s also great for using on transfer papers, again, because it doesn’t rip into the paper like a pointed tool does. These tools come in a variety of sizes and sets, which make it easy to carve various line weights as well as make different kinds and sizes of marks using transfer papers.
This tool is available online and in-store from most craft stores and online at Amazon here. There are also many variety sets available for purchase online here.


5. Apollon Elephant Painting Panels

apollon-elephant-painting-panels-standard

Just plain, old raw birch painting panels, they are cheap, well made, sturdy and most importantly, they are lightweight. I use about 15-20 layers of wax on my paintings and many artists use much more. With the weight of that much wax combined with the weight of a wooden painting panel, the finished painting feels like lead. Imagine hanging a show with 10-20 lead panels by yourself! So lightweight, but durable, is key for me. Also, for a starving artist on a budget, the price can’t be beat. I have tried and just can’t find a comparable, quality painting panel even close to the price of these. Also, they scorch to a lovely caramel or dark brown/black. For those of you who don’t know, I always begin my paintings with a gridded pattern of scorched brands. My newer work utilizes much more paint and for the most part, the brands are concealed…but I still begin the painting that way, it just feels incomplete without.
These panels are sold with a 1.5 inch cradle (deep) as well as uncradled (standard) with a 1 inch depth. Also very useful are the quarter inch panels I’ve seen only in the store. I use these for samples in workshops, for color tests or brush tests in the studio and anytime I need a wooden surface, but don’t want to use a whole panel.
The painting panels and birch panels are sold exclusively at Artist & Craftsman Supply, both online (with sizes up to 24×24) here and in store for all painting panel sizes up to 60×60.


***Stay tuned for the next blog post on my favorite encaustic paint colors.

New Drawings Series

As promised in my last post, this months post is devoted to a new drawings series that I began during the workshop I taught in Torrey, Utah with artist friend, Jeff Juhlin. I continued to work with these drawings through subsequent travels and at home during the months to follow.

I should mention that my previous feeble attempts at drawing the Torrey landscape from life were just horrendous. Whenever I try to control anything I do in the art making process, it turns out to look contrived and just awful. This landscape is especially overwhelming, wherever you look there is something inspiring, something as an artist I wanted to capture and hold. I couldn’t do it by just doing it, I had to invent a process.

The focus of the workshop was making marks inspired by hikes through this amazing landscape and then translating those marks to encaustic paintings. One of our mark-making exercises was to collect items from the landscape that could be made into brushes or other types of mark-making tools. We then dipped these brushes and tools into Speedball Super Black India ink and made marks in response to meditations and sketches from our hikes. Working in my favorite 6×6 Stillman & Birn, Zeta series sketchbook**, I took a slightly different approach and instead made marks that loosely followed the contour of the landscape as I observed it through the studio window as well as from my sketches made on our hikes. These contour marks along with the brushes that made them are below.

I liked the marks I had made but I felt that something more was needed so I just started working back into them and responding to the marks with two of my favorite drawing pens..a Pilot G-Tec-C4 for thin lines and a small size Faber Castell Pitt artist pen for thicker lines. The results are so complex and full of life! I love that these drawings are made with a combination of my hand and the actual landscape itself. Unbelievably, through this simple process I arrived at drawings that look like what I had been trying to capture in those first unsuccessful drawings from life…and I got there through process and giving up a bit of control…two techniques that I constantly have to remind myself (and my students) to employ in the work.

These drawings are immensely gratifying, meditative and I just love the results. People I’ve shown them to ask me what I’m going to do with them and I haven’t really decided. I’m thinking that making them on larger sheets of paper might be an idea or using them somehow in my paintings might be another. Right now, I’m just going to focus on making more of them.

If these posts about Torrey, Utah have inspired you, you are in luck because Jeff Juhlin and I will be teaching in Torrey together again in August, 2017. Visit the updated blog post for details about this exciting workshop. If you are interested, you had better hurry…there are only 2 spots left!!

For even more inspiration, view two other posts on Torrey here and here. To learn more about employing process in your own work, see notes from a talk I gave last year at the International Encaustic Conference here. For more inspiration on lines, see this post here and follow my Marks Pinterest board here.

**I LOVE this sketchbook! Thick, quality paper that holds water media, ink, etc. and stays flat, without any curling or buckling. It’s very sturdy, stayed intact through six months of travel and many hikes. Get one, especially if you like to sketch in any kind of water media!